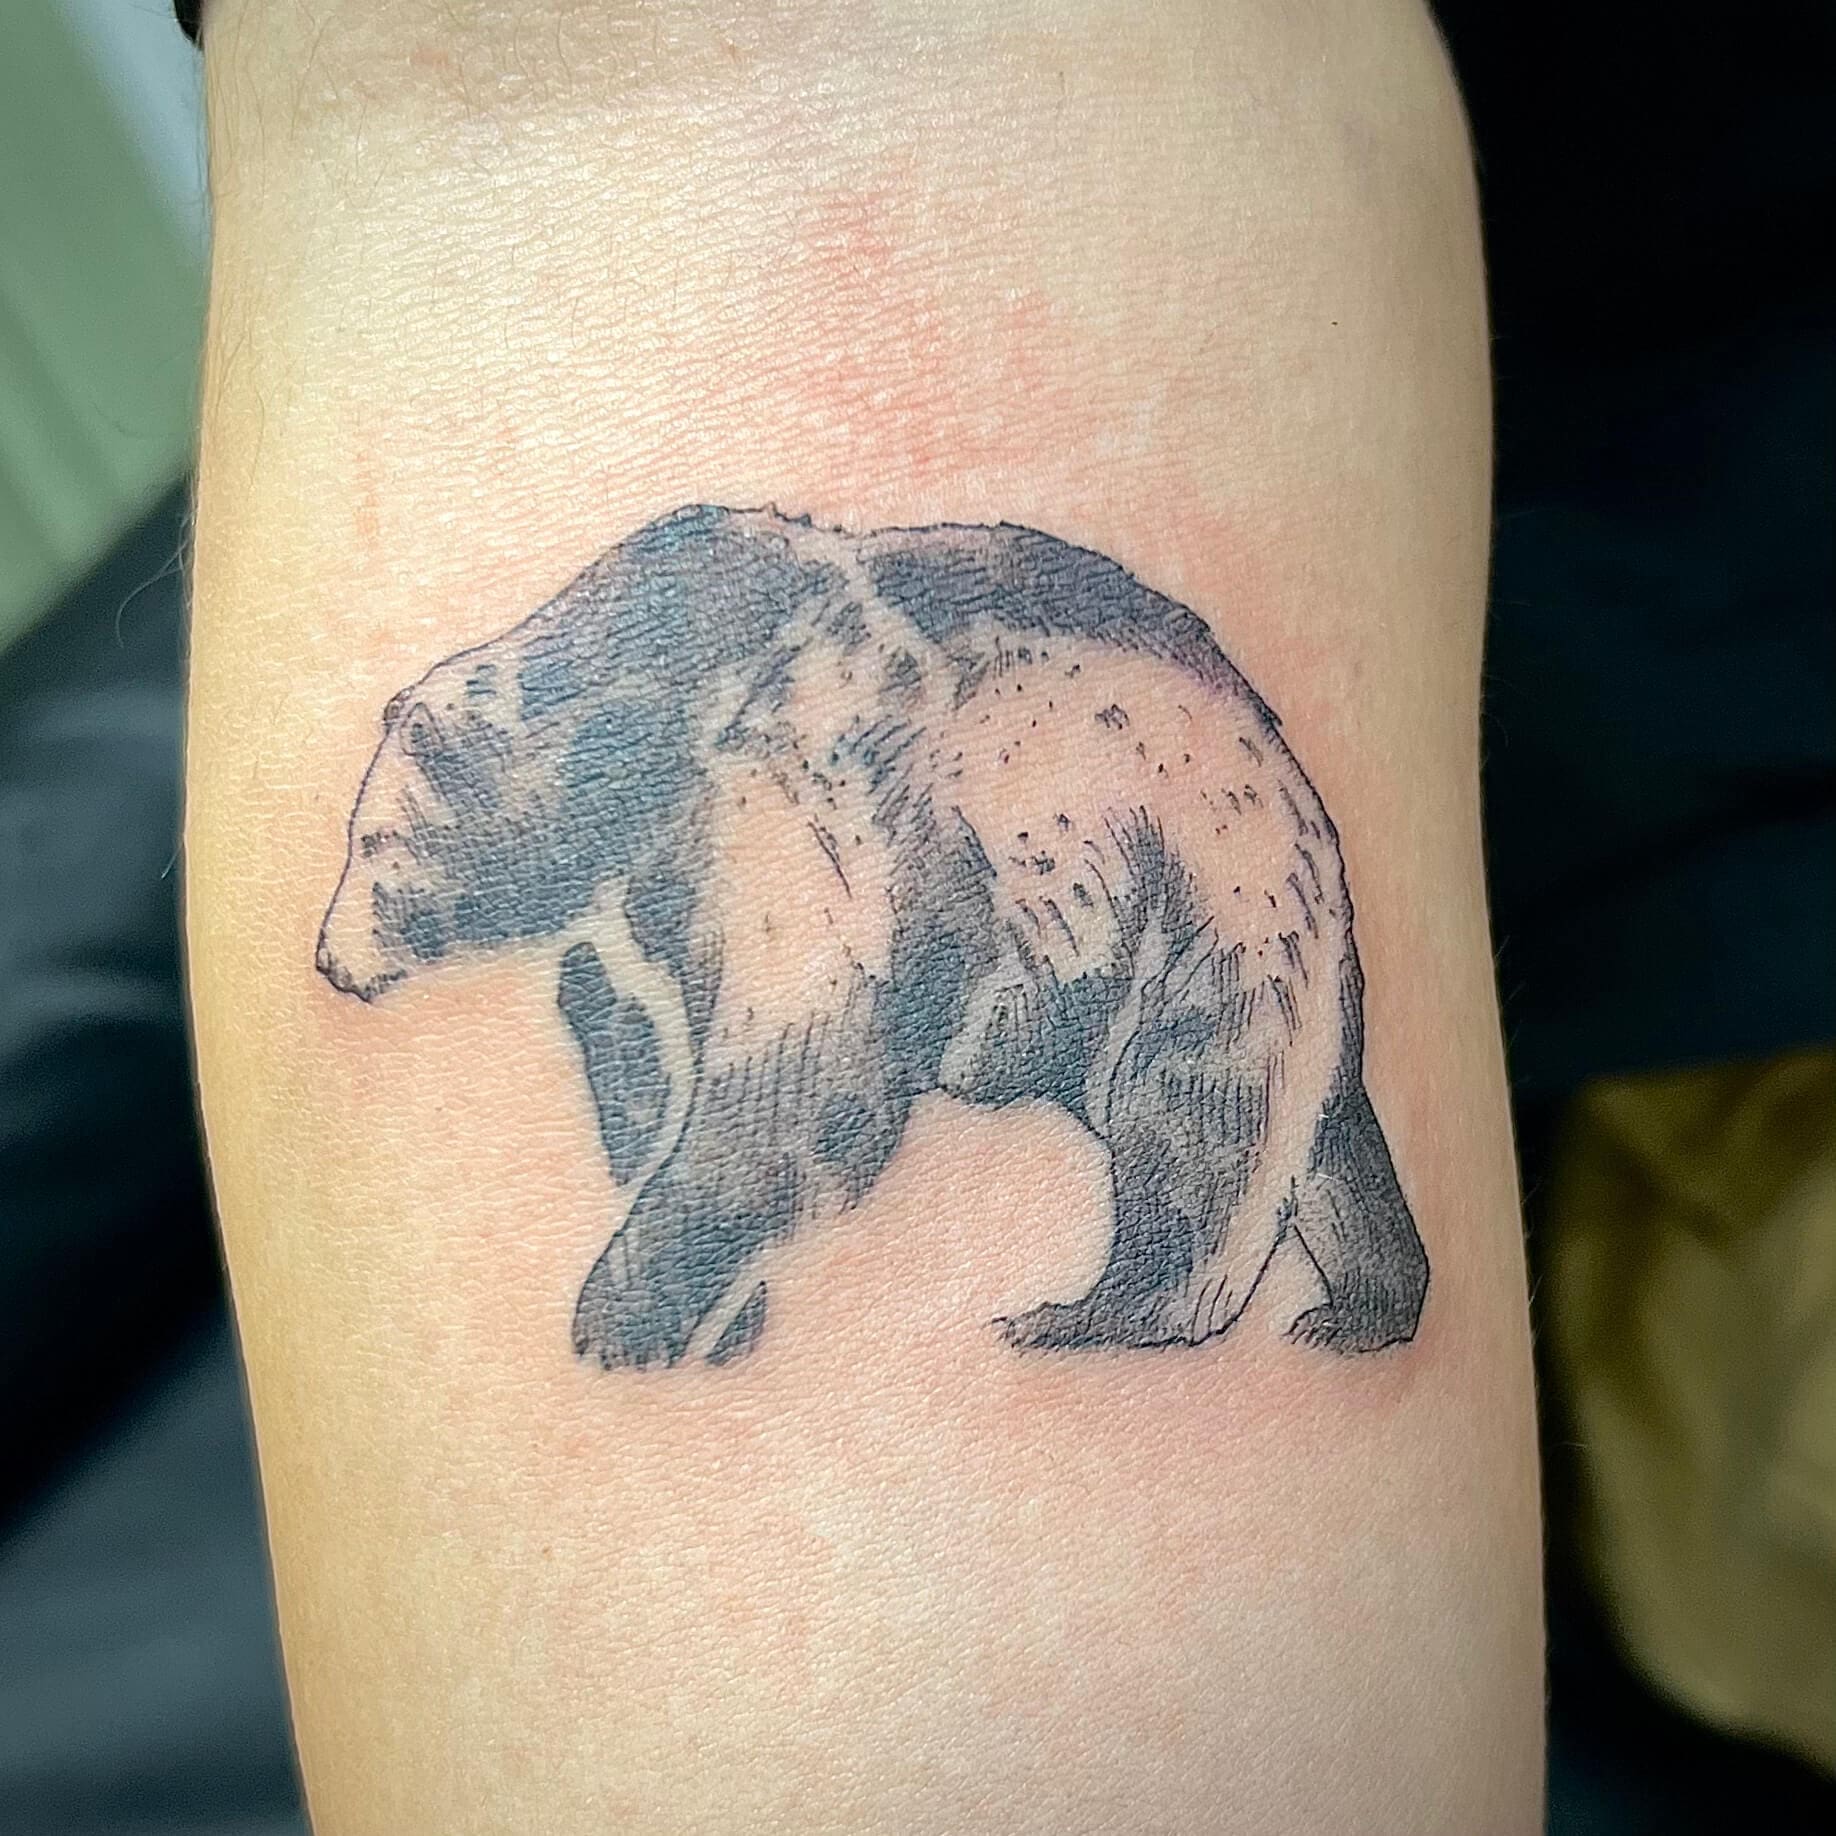
Etched and woodcut-style tattoo design adapts the visual language of historic printmaking for the body. These tattoos often resemble illustrations from medieval manuscripts, Renaissance engravings, botanical plates, anatomy books, religious prints, and early natural-history collections.
Etched tattoos usually use fine contour lines, curved hatching, cross-hatching, and stippling to create controlled shadows. The finished design can feel delicate, detailed, and similar to an image drawn into a metal plate.
A tattoo artist must decide which details define the subject and which can be removed. Strong silhouettes, clear tonal groups, durable negative space, and enough separation between lines are often more important than reproducing every mark from the original image.
Scale and placement also affect how much detail the tattoo can support. A small forearm design may work best as one flower, animal, skull, dagger, or anatomical object, while a thigh, chest, or back piece can hold architecture, several figures, and a complete narrative scene.
The shape of the design should follow the body. Vertical subjects such as flowers, ships, towers, and standing figures often suit the forearm or calf, while circular seals and celestial designs may fit the shoulder, chest, upper arm, or thigh.
Key Takeaways
- Etched tattoos usually use fine, fluid hatching and gradual tonal detail.
- Engraving tattoos often feature precise contours, controlled cross-hatching, and clearly structured shadows.
- Woodcut tattoos rely more heavily on bold lines, rough textures, simplified forms, and solid black.
- The main subject should remain recognizable before the viewer notices the smallest details.
- Larger tattoos can support more figures, line intersections, lettering, architecture, and background imagery.
- Small designs usually work best with one clear subject and limited internal shading.
- Negative space and skin breaks help prevent feathers, scales, leaves, and cross-hatching from merging visually.
- Historical prints normally need to be simplified and redrawn for the chosen size and body placement.
- Medieval, botanical, animal, anatomical, religious, occult, maritime, celestial, and memento mori imagery all suit the style.
- Black ink creates the most traditional printed appearance, although sepia, muted red, and limited color palettes can also work.
- Healed tattoo photographs provide better evidence of line stability, spacing, and black saturation than fresh images.
- Cost and session requirements depend on size, complexity, placement, shading density, artist experience, and local studio pricing.
Choose What You Need From This Guide
Use the table below to move directly to the section that matches your goal.
| What You Want to Know | Section |
| Understand the style | What Are Etched, Engraving, and Woodcut Tattoos? |
| Compare the styles | Etched vs Engraving vs Woodcut Tattoos |
| Learn how the design is built | The Five Rules of a Tattooable Engraving |
| Explore tattoo ideas | Etched and Woodcut Tattoo Ideas |
| Choose a composition | Choosing the Right Composition |
| Select a size or placement | Matching Scale, Detail, and Placement |
| Understand aging | How Etched and Woodcut Tattoos Age |
| Choose an artist | How to Choose an Engraving-Style Tattoo Artist |
| Prepare for a custom design | From Historical Reference to Custom Tattoo |
| Review costs and sessions | Cost, Sessions, and Touch-Up Expectations |
What Are Etched, Engraving, and Woodcut Tattoos?
Etched, engraving, and woodcut tattoos are illustrative styles inspired by traditional printmaking. They use visible lines, dots, black shapes, and open skin to create form and shadow.
The three styles overlap, but each has a different visual character.
What an Etched Tattoo Looks Like
Etched tattoos usually use fine, fluid lines and gradual hatching.
They often suit botanical studies, anatomy, human figures, animals, and celestial imagery.
The result tends to feel detailed, refined, and similar to an illustration drawn into a metal plate.
What an Engraving Tattoo Looks Like
Engraving tattoos use sharper contours and more controlled cross-hatching.
They work well for architecture, heraldry, portraits, anatomy, and classical figures.
The style often feels precise and structured, with clear light, middle, and dark areas.
What a Woodcut Tattoo Looks Like
Woodcut tattoos use bolder outlines, rough carved marks, simplified shapes, and heavier blackwork.
Common subjects include knights, saints, ravens, dragons, castles, ships, and folklore creatures.
The result usually feels graphic, dramatic, and connected to medieval or early printed imagery.
Why the Styles Often Overlap
Modern tattoos may combine fine engraving details with heavier woodcut textures.
A face may use controlled hatching, while the frame or background uses rough blackwork.
The combination works when the line weight, contrast, and composition still feel consistent.
Etched vs Engraving vs Woodcut Tattoos
Etched, engraving, and woodcut tattoos share a printmaking influence, but their linework and visual weight differ.
Etched tattoos usually feel lighter and more fluid. Engraving tattoos look sharper and more controlled, while woodcut tattoos rely on bolder marks and stronger black shapes.
| Style | Line Character | Shading Approach | Common Subjects | Overall Effect |
| Etched | Fine and fluid | Layered hatching and stippling | Botanicals, anatomy, figures | Refined and atmospheric |
| Engraving | Sharp and precise | Controlled cross-hatching | Architecture, portraits, heraldry | Structured and detailed |
| Woodcut | Bold and rough | Carved cuts and solid black | Medieval imagery, animals, folklore | Graphic and dramatic |
| Fine-line | Thin and delicate | Minimal or light shading | Florals, symbols, small illustrations | Soft and restrained |
| Blackwork | Heavy and graphic | Solid black and skin breaks | Symbols, animals, ornament | High contrast |
| Dotwork | Repeated dots | Gradual tonal fields | Geometry, celestial imagery | Textured and atmospheric |
Are Engraving Tattoos Fine-Line Tattoos?
Some engraving tattoos use fine lines, but the styles are not identical.
Fine-line tattooing is defined mainly by narrow line weight. Engraving tattooing is defined by how contour lines, hatching, dots, and black shapes build the image.
An engraving tattoo may use delicate internal lines with heavier outer contours and areas of solid black.
Woodcut Tattoo vs Medieval Tattoo
Woodcut describes the visual treatment of the tattoo. Medieval describes the historical period or subject matter.
A knight, castle, saint, or heraldic animal can be tattooed in woodcut, blackwork, realism, or fine line.
A woodcut tattoo can also feature a modern subject. The carved marks, rough texture, and strong contrast define the style more than the age of the imagery.
How Blackwork and Dotwork Fit the Style
Blackwork adds visual weight through solid black areas, silhouettes, and skin breaks.
Dotwork creates softer tonal transitions, grain, smoke, and atmospheric texture.
Both techniques can support an etched or woodcut design, but neither automatically creates the printmaking effect on its own.
The Five Rules of a Tattooable Engraving
Historical prints often contain more detail than skin can support at the same scale.
These five rules help preserve the appearance of the reference while making the design clearer and more durable as a tattoo.
1. Preserve the Silhouette
The main subject should remain recognizable before the viewer notices the smaller details.
Clear outer contours and open space around the focal point help separate it from the background.
2. Match Detail to Scale
Larger tattoos can support more figures, facial details, lettering, architecture, and hatching.
Smaller tattoos usually need one main subject, fewer internal lines, and wider gaps between marks.
3. Separate the Tonal Groups
The design should have clear light, middle, and dark areas.
Open skin can create highlights, hatching can form midtones, and cross-hatching or solid black can establish deep shadows.
4. Leave Durable Negative Space
Open skin separates feathers, scales, leaves, black shapes, and groups of hatching.
These gaps need enough width to remain visible after the tattoo heals.
5. Redraw for Anatomy and Movement
A historical image designed for flat paper must be adjusted for the curves and movement of the body.
Circles, architecture, borders, and symmetrical forms may need to be reshaped before the stencil is applied.
| Rule | Main Question |
| Preserve the silhouette | Is the subject recognizable from a distance? |
| Match detail to scale | Is there enough space for every important feature? |
| Separate tonal groups | Are the light and dark areas clearly defined? |
| Leave negative space | Will the important gaps remain visible? |
| Redraw for the body | Does the composition fit the placement naturally? |
These rules should guide every stage of the design, from reference selection to the final stencil.
Line and Shading Techniques
Etched and woodcut tattoos use visible marks to create form, depth, and texture.
The artist may combine several techniques, but the linework should follow one clear lighting and composition system.
Cross-Hatching
Cross-hatching uses intersecting lines to create darker shadows.
It works well for faces, fabric, anatomy, fur, feathers, and architecture, but the lines need enough spacing to remain separate.
Parallel Hatching
Parallel hatching uses lines that follow the same general direction.
These marks can describe curved forms, flowing fabric, leaves, waves, muscle, wood, and metal.
Stippling
Stippling creates value through repeated dots.
It is useful for smoke, skies, skin texture, halos, grain, and softer transitions between shadow and open skin.
Contour Lines
Contour lines define the outer shape and internal structure of the subject.
A slightly stronger outer contour can protect the silhouette, while lighter internal lines preserve detail.
Solid Black
Solid black creates the deepest shadows and gives the design visual weight.
It can be used in clothing, wings, windows, shields, backgrounds, and decorative borders.
Skin Breaks and Negative Space
Skin breaks are open gaps between lines, textures, and black areas.
They help separate feathers, scales, leaves, hatching groups, and overlapping objects.
Fine-Line Detailing
Fine lines can add hair, veins, feather edges, cracks, scales, and ornament.
These details should support the main subject rather than compete with it.
Woodgrain and Rough-Cut Texture
Woodgrain texture uses broken lines, scratches, knots, and uneven cuts to create a carved-block appearance.
It works best in selected areas rather than across the entire design.
| Technique | Best Use | Main Risk |
| Cross-hatching | Deep shadow | Lines may merge |
| Parallel hatching | Form and movement | Poor direction can flatten the subject |
| Stippling | Gradual texture | Too many dots can weaken clarity |
| Contour lines | Shape definition | Excess lines can create clutter |
| Solid black | Depth and contrast | Dark areas may overpower detail |
| Skin breaks | Separation and highlights | Gaps may be too narrow |
| Fine-line detail | Surface texture | Small marks may soften |
| Woodgrain texture | Distressed carved effect | Excessive visual noise |
Etched and Woodcut Tattoo Ideas
The strongest ideas begin with one clear subject and a consistent symbolic direction.
Composition and placement should be considered before adding extra objects or background detail.
Medieval and Knight Designs
Popular concepts include knights, helmets, castles, banners, swords, dragons, and heraldic animals.
These designs can represent courage, duty, conflict, protection, or sacrifice.
Botanical Engraving Designs
Flowers, roots, poisonous plants, herbs, mushrooms, and insects work well as vertical specimen designs.
They may symbolize growth, healing, danger, decay, ancestry, or transformation.
Animal and Natural-History Designs
Ravens, wolves, stags, snakes, moths, beetles, and birds of prey suit hatching and blackwork.
Profile views create clear silhouettes, while front-facing designs feel more heraldic or ritualistic.
Anatomical Engraving Designs
Common subjects include hearts, skulls, skeletal hands, eyes, bones, and organs.
They can be combined with flowers, candles, celestial symbols, or medical-style labels.
Religious and Sacred Designs
Saints, angels, sacred hearts, crosses, halos, relics, and cathedral imagery fit the historical print style.
Symmetrical and framed compositions often work well for these subjects.
Occult and Alchemical Designs
Common ideas include sigils, planetary symbols, eyes, serpents, ritual hands, moons, and alchemical seals.
Circular compositions help organize these symbols without overcrowding the design.
Memento Mori and Vanitas Designs
Skulls, candles, hourglasses, mirrors, dying flowers, fruit, coins, and books can express mortality and impermanence.
Larger placements are usually better when several symbolic objects are included.
Maritime Designs
Ships, anchors, lighthouses, waves, sea monsters, compasses, and celestial navigation tools suit both engraving and woodcut approaches.
Vertical ships work well on the calf or forearm, while wider scenes suit the thigh, chest, or back.
Celestial Designs
Suns, moons, stars, eclipses, astrolabes, and planetary charts work well in circular or symmetrical compositions.
Open skin can help preserve the central light source or ring.
Small Engraving Tattoo Ideas
Small designs work best with one subject, such as a flower, beetle, skull, dagger, eye, moon, animal head, or anatomical heart.
Limit the hatching, lettering, and background detail so the image remains clear.
Sleeve and Back-Piece Ideas
Larger projects can combine medieval scenes, architecture, botanicals, anatomy, maritime imagery, or folklore.
The composition should still have one main focal point and a clear light-to-dark structure.
| Tattoo Idea | Best Composition | Suggested Placement |
| Knight and dragon | Narrative | Thigh or back |
| Botanical specimen | Vertical | Forearm or calf |
| Raven | Isolated or framed | Upper arm or thigh |
| Anatomical heart | Framed | Forearm or chest |
| Alchemical seal | Circular | Shoulder or chest |
| Ship in a storm | Narrative | Calf, thigh, or back |
| Skull and candle | Vanitas | Upper arm or thigh |
| Cathedral | Vertical | Calf or back |
One strong image usually creates more impact than a crowded collection of unrelated symbols.
Choosing the Right Composition
Composition determines how the subject fits the body and where the viewer looks first.
The best structure depends on the subject, placement, and amount of detail.
Isolated Composition
An isolated design uses one main subject with little or no background.
It works well for animals, plants, insects, organs, weapons, and small symbolic objects.
Vertical Composition
Vertical designs suit flowers, ships, towers, swords, snakes, roots, and standing figures.
They often fit the forearm, calf, ribs, spine, or thigh.
Circular Composition
Circular designs work well for celestial symbols, seals, wreaths, coiled creatures, eyes, and ritual imagery.
The shoulder, chest, upper arm, and thigh can support this shape.
Symmetrical Composition
Symmetrical designs suit wings, crests, paired animals, sacred imagery, and ornamental work.
They often fit the chest, sternum, upper back, or spine.
Framed Composition
Frames can make the tattoo resemble a manuscript page, bookplate, or antique illustration.
They work well around saints, portraits, anatomical studies, botanicals, and heraldic designs.
Body-Wrapping Composition
Snakes, vines, waves, smoke, ropes, and other long subjects can follow the curve of an arm, leg, or torso.
The focal point should remain visible from the main viewing angle.
Narrative Composition
Narrative designs show an event, conflict, journey, or ritual.
They usually need larger placements such as the thigh, chest, back, or full sleeve.
| Composition | Suitable Subjects | Useful Placements |
| Isolated | Animals, plants, organs, symbols | Forearm, calf, upper arm |
| Vertical | Ships, towers, flowers, snakes | Forearm, calf, ribs |
| Circular | Seals, suns, moons, coiled animals | Shoulder, chest, thigh |
| Symmetrical | Wings, crests, sacred imagery | Chest, sternum, upper back |
| Framed | Saints, portraits, specimens | Forearm, thigh, back |
| Body-wrapping | Vines, snakes, waves, smoke | Arm, leg, torso |
| Narrative | Battles, rituals, journeys | Back, chest, thigh |
The composition should support the main subject rather than surround it with unnecessary detail.
Choosing a Color Strategy
Black ink is the most common choice because it creates the clearest connection to historical prints.
Color can still work when it is limited and supports the main design.
Black Only
Black provides strong contrast and keeps the focus on linework, shading, and negative space.
It suits nearly every etched or woodcut subject.
Black and Muted Red
Muted red can highlight blood, fire, flowers, banners, sacred hearts, and ritual symbols.
The red should remain secondary to the black structure.
Sepia and Brown
Brown or sepia tones can create an aged manuscript or botanical-plate effect.
The artist should consider how the pigment will appear against the wearer’s skin tone.
Limited Color Palette
Two or three restrained colors can imitate a hand-colored historical print.
Too many colors may weaken the engraved appearance.
White Ink Highlights
White ink may be used for small accents, but open skin should remain the main source of highlights.
| Color Approach | Best Effect |
| Black only | Traditional engraved appearance |
| Black and muted red | Strong symbolic emphasis |
| Sepia or brown | Aged manuscript effect |
| Limited palette | Hand-colored print appearance |
| White accents | Small secondary highlights |
The color strategy should strengthen the focal point without hiding the linework that defines the style.
Matching Scale, Detail, and Placement
The size of the tattoo determines how much detail the design can support.
More figures, lettering, hatching, and architecture require more space.
How Small Can an Engraving Tattoo Be?
There is no universal minimum size.
The workable size depends on the number of subjects, facial details, lettering, line intersections, shading density, and placement.
Small designs should focus on one clear subject with limited internal texture.
Small Designs
Suitable ideas include flowers, insects, skulls, eyes, daggers, moons, animal heads, and anatomical hearts.
Use stronger outlines, fewer hatch lines, and more open skin.
Medium Designs
Medium tattoos can include one central subject with a simple frame, background, or supporting symbol.
The forearm, calf, upper arm, shoulder blade, ribs, and thigh often provide enough room.
Large Designs
Large pieces can support several figures, architecture, landscapes, and narrative scenes.
The thigh, chest, back, side, and full sleeve are better for complex compositions.
Placement Guide
| Placement | Best Design Shape | Main Consideration |
| Forearm | Vertical or isolated | Limited width |
| Calf | Vertical or narrative | Good length |
| Upper arm | Circular or framed | Curvature |
| Thigh | Framed or narrative | Strong detail capacity |
| Chest | Symmetrical or wide | Central alignment |
| Sternum | Symmetrical or ornamental | Careful body mapping |
| Back | Large narrative | Broad composition |
| Ribs | Vertical or flowing | Body movement |
| Hand or wrist | Simplified isolated subject | Wear and limited space |
A larger design is often the better choice when the reference contains several faces, small text, dense cross-hatching, or detailed architecture.
How Etched and Woodcut Tattoos Age
Etched and woodcut tattoos can age well when the design has enough space, contrast, and negative space.
Long-term clarity also depends on placement, application, healing, and sun exposure.
Normal Line Softening
Tattoo lines usually settle and become less sharp than they appear when fresh.
This is normal and does not always reduce the readability of the design.
Dense Line Merging
Cross-hatching and narrow skin breaks may lose separation when they are packed too closely.
Simplifying the design or increasing its size can reduce this risk.
Fine Detail Loss
Tiny lettering, facial features, dots, and decorative marks may become less distinct over time.
The main silhouette and larger tonal shapes should carry the design.
Placement and Friction
Hands, fingers, feet, wrists, and other high-friction areas may show wear differently from the upper arm, thigh, calf, chest, or back.
Placement should be considered before finalizing the level of detail.
Healing and Aftercare
Follow the artist’s instructions for cleaning, moisturizing, clothing, activity, and sun protection.
Proper healing supports more consistent linework and black saturation.
Touch-Ups
A touch-up may be needed if part of the tattoo heals lighter or loses consistency.
The need depends on the placement, healing process, application, and studio policy.
| Aging Factor | Possible Effect | Design Response |
| Dense hatching | Lines may merge | Increase spacing |
| Tiny details | Reduced clarity | Simplify or enlarge |
| Narrow skin breaks | Lost separation | Use wider gaps |
| High-friction placement | Faster visible wear | Reduce delicate detail |
| Sun exposure | Fading and softening | Use long-term protection |
| Uneven healing | Lighter sections | Assess after healing |
The tattoo should be designed to remain recognizable even if the smallest details soften.
How to Choose an Engraving-Style Tattoo Artist
Choose an artist with clear experience in engraving, woodcut, illustrative blackwork, or detailed line-based tattooing.
A general fine-line portfolio is not enough if it does not show controlled hatching, strong silhouettes, and healed results.
Review Healed Work
Healed photographs show how the lines, blackwork, spacing, and negative space settle over time.
Fresh tattoos may appear sharper and darker than the final healed result.
Check the Hatching
Look for consistent line direction, clean spacing, and deliberate changes in density.
Cross-hatching should create form rather than appear as a random grid.
Evaluate the Silhouette
The main subject should remain recognizable from a normal viewing distance.
Heavy background texture should not hide the face, animal, symbol, or central object.
Inspect Black Saturation
Solid black areas should appear even and clearly separated from nearby fine details.
Patchy fills or crowded edges may weaken the composition.
Review Anatomy and Geometry
Check hands, faces, animals, architecture, circles, and symmetrical elements.
These subjects reveal the artist’s drawing and placement skills.
Confirm Reference Adaptation Skills
The artist should be able to simplify a historical print and redraw it for the body.
Ask how the design will change based on the size, placement, and amount of detail.
| Portfolio Element | What to Check |
| Healed photographs | Settled linework and contrast |
| Hatching | Direction, spacing, and consistency |
| Silhouette | Clear subject recognition |
| Solid black | Even saturation |
| Anatomy | Accurate hands, faces, and animals |
| Geometry | Clean circles, structures, and symmetry |
| Placement | Natural fit with the body |
| Reference work | Original adaptation rather than direct copying |
A skilled artist should explain the limitations of the concept clearly rather than promise that every detail can be preserved.
From Historical Reference to Custom Tattoo
A historical image should be used as the starting point for a custom composition, not copied onto the skin without changes.
The process should connect the subject, meaning, placement, and available space.
Choose the Main Subject
Start with one central figure, animal, plant, object, building, or symbol.
Additional elements should support that subject.
Define the Meaning
Clarify what the design should represent, such as courage, mortality, faith, transformation, memory, or protection.
This helps the artist remove symbols that do not support the main idea.
Select the Visual Direction
Choose whether the design should feel like a refined engraving, rough woodcut, botanical plate, anatomical study, or medieval print.
A clear direction keeps the linework and texture consistent.
Choose the Placement
The placement affects the shape, scale, and level of detail.
Bring one or two placement options to the consultation when possible.
Determine the Workable Size
The artist should assess whether the design has enough room for faces, lettering, hatching, and background elements.
Some details may need to be enlarged, simplified, or removed.
Provide Useful References
Bring historical prints, subject references, symbolic details, and examples of preferred linework.
Avoid using another artist’s finished tattoo as the exact design.
Review the Final Composition
Check the focal point, silhouette, contrast, negative space, and body flow before approving the stencil.
| Stage | Main Decision |
| Concept | Main subject and symbolism |
| Style | Etching, engraving, woodcut, or hybrid |
| Placement | Body area and design shape |
| Scale | Workable level of detail |
| References | Historical and visual direction |
| Redrawing | Simplification for skin |
| Approval | Composition and contrast |
| Booking | Deposit, date, and studio requirements |
A consultation should turn the reference into an original tattoo designed for the wearer’s body.
Cost, Sessions, and Touch-Up Expectations
The cost of an engraving-style tattoo depends on the size, detail, placement, artist experience, and number of sessions.
Dense hatching, solid black areas, architecture, multiple figures, and difficult placements usually require more time.
What Affects the Cost?
Main factors include:
- Tattoo size
- Design complexity
- Placement
- Amount of shading
- Solid black saturation
- Artist experience
- Number of sessions
- Local studio pricing
A consultation is the best way to receive an accurate estimate because the artist must review the actual concept and placement.
What Affects the Number of Sessions?
Small isolated designs may be completed in one appointment.
Large narrative pieces, sleeves, chest panels, and back pieces may be divided into outlining, shading, blackwork, and finishing sessions.
Session planning also depends on the wearer’s comfort and the amount of detail that can be completed carefully.
When Might a Touch-Up Be Needed?
A touch-up may be recommended when part of the tattoo heals lighter or loses consistency.
The need depends on placement, healing, application, black saturation, and studio policy.
| Factor | Effect on Cost or Sessions |
| Larger size | More tattooing time |
| Dense hatching | Slower linework |
| Heavy blackwork | More saturation time |
| Difficult placement | More positioning and breaks |
| Multiple figures | More design complexity |
| Several sessions | Higher total investment |
The artist should explain the estimated scope, session structure, deposit, and touch-up policy before booking.
Using Historical Artwork Responsibly
Historical engravings, botanical plates, manuscripts, and woodcuts can provide strong tattoo references.
The final design should still be adapted into an original composition.
Public-Domain Sources
Many older artworks may be in the public domain, but their status should be checked before use.
A public-domain image can provide the subject, pose, composition, or historical direction.
Modern Restorations and Reproductions
A modern redraw, recoloring, restoration, or commercial scan may involve separate rights.
Use the original historical source when possible rather than copying a modern adaptation.
Do Not Copy Another Artist’s Tattoo
Using the same old print is different from copying another tattoo artist’s finished design.
The artist should redraw the reference for the wearer’s placement, symbolism, and preferred style.
Research the Symbols
Religious, heraldic, occult, and political symbols may carry specific meanings.
Understanding those meanings helps prevent inaccurate or unintended combinations.
Build an Original Composition
The artist may combine the subject from one reference, the framing from another, and original supporting elements.
The result should feel connected to the historical source without becoming a direct copy.
| Reference Type | Best Use |
| Public-domain engraving | Main historical inspiration |
| Botanical or anatomical plate | Subject and structure |
| Museum archive image | Period reference |
| Modern restoration | Secondary visual reference |
| Another artist’s tattoo | Style discussion only, not copying |
Responsible reference use protects originality while giving the tattoo a clear historical foundation.
Common Mistakes That Weaken the Design
Most problems come from forcing too much detail into too little space.
The design should remain readable before the smallest textures are added.
| Mistake | Likely Result | Better Approach |
| Making the design too small | Lines and features may merge | Increase the size or simplify |
| Adding equal detail everywhere | Weak focal point | Concentrate detail around the subject |
| Using too little negative space | Dark, crowded areas | Preserve wider skin breaks |
| Copying a historical print exactly | Poor fit on the body | Redraw it for the placement |
| Combining unrelated symbols | Confusing meaning | Build around one central theme |
| Placing rigid geometry on curved anatomy | Visible distortion | Adjust the stencil to the body |
| Choosing an artist from fresh photos only | Longevity is unclear | Review healed work |
A strong etched or woodcut tattoo does not need to preserve every mark from the reference.
Removing unnecessary detail often improves the composition and helps the design age more clearly.
Frequently Asked Questions
Some engraving tattoos use fine lines, but the style is defined by printmaking-inspired hatching, contours, and shading rather than line thickness alone.
Yes. Black is the most common choice, but muted red, sepia, brown, and limited color palettes can work.
Yes, but the design still needs enough contrast between light, middle, and dark areas.
Hatching and stippling can create shadow when large black fills are not used.
Possibly. Cover-ups usually require more size, contrast, texture, and blackwork than a delicate line-only design.
Yes. The artist may adjust the line weight, spacing, contrast, and amount of fine detail.
Review healed work on similar skin tones when choosing an artist.
Yes, but the lettering needs enough size and spacing to remain readable.
Short banners, dates, labels, and captions usually work better than long passages.
Yes, especially when the first design leaves room for connecting elements such as vines, clouds, waves, architecture, or ornamental borders.
Future expansion should be considered before the original placement is finalized.
Pain depends more on placement, session length, individual sensitivity, and tattooing technique than on the visual style itself.
Bring your historical references, preferred subject, symbolism, placement ideas, approximate size, and examples of the line or texture you prefer.
Follow the artist’s healing timeline and studio policy.
The tattoo should be fully healed before its final linework and saturation are evaluated.
Turn Historical Printmaking Into a Tattoo Designed for Skin
A strong etched or woodcut tattoo does not depend on preserving every line from an old print.
The design should keep the subject recognizable, match the detail to the available space, separate the tonal values, preserve negative space, and follow the shape of the body.
Historical references provide the style, symbolism, and atmosphere. The tattoo artist’s role is to simplify and redraw those references into an original composition that can heal clearly.
Choose an artist whose healed work shows controlled hatching, strong silhouettes, even black saturation, and thoughtful placement.
Bring your preferred subject, historical references, symbolism, placement ideas, and approximate size to the consultation. The artist can then determine the workable scale, remove unnecessary details, and build the design around your body.
The best etched and woodcut-style tattoos feel connected to historic printmaking while still functioning as clear, durable, and personal body art.